About features of Managed Rules Plus
AWS WAF v2New PlanFeature / Spec.Managed Rule Plus
Overview
The following features are available in Managed Rules Plus (also known as WafCharm Lite and abbreviated as MR Plus):
- IP address management
- Dynamic denylist [WAF log integration required]
- Monthly reports [WAF log integration required]
- Member settings
Note: Features marked with [WAF log integration required] require WAF log integration to be enabled. If WAF log integration is not enabled, these features will not be available.
IP address management
These features are related to IP address management. You can view details and configure settings from the [Rule Configuration] tab within the WAF Config on the WafCharm Console.
The following configuration items are included:
- Allowlist
- Denylist
- Dynamic denylist
- IP address to use
- Exceptions (Exception IP List)
Allowlist
This feature allows you to register IP addresses that should always be allowed.
For instructions on how to add IP addresses, refer to:
Rule configurations in WAF Config (AWS WAF v2) – IP addresses – Allowlist
If you edit the rule directly from the AWS Management Console (e.g., by adding an IP address), your changes will not be preserved. Settings configured in the WafCharm Console take precedence, so please make sure to add or remove IP addresses through the WafCharm Console.
Denylist
This feature allows you to register IP addresses that should always be blocked. Unlike the dynamic denylist feature, this is a manually managed list. If you need to block IP addresses permanently, please use this feature.
For instructions on how to add IP addresses, refer to:
Rule configurations in WAF Config (AWS WAF v2) – IP addresses – Denylist
If you edit the rule directly from the AWS Management Console (e.g., by adding an IP address), your changes will not be preserved. Settings configured in the WafCharm Console take precedence, so please make sure to add or remove IP addresses through the WafCharm Console.
Please also keep the following in mind:
- There are two separate denylist-related rules:
- WafCharm_DenyIps_XXX: For manually registered IP addresses.
- WafCharm_Automated_DenyIps_XXX: For IP addresses added via the dynamic denylist feature or the IP reputation feature.
- Denylist update timing:
- Dynamic denylist feature: Every 5 minutes
- IP reputation feature: Once per day
- Manual denylist feature: Immediately (may vary slightly depending on conditions)
Dynamic denylist
This feature allows you to change the rule action for rules created by the dynamic denylist functionality.
The dynamic denylist rule includes IP addresses registered through the following two features:
- Dynamic denylist feature
Re-evaluates your WAF logs against hundreds of security signatures. IP addresses associated with detected threats are automatically added to the denylist.- This feature uses WAF logs for re-evaluation. If WAF log retrieval is disabled, the feature will not function, and re-evaluation will not occur.
- For details, see: Dynamic denylist (WAF log retrieval required)
- IP reputation feature
Automatically adds malicious IP addresses based on Cyber Security Cloud’s proprietary IP reputation system.- This feature is available regardless of WAF log retrieval configuration.
For instructions on how to change the rule action, see:
How to change rule actions for AWS WAF v2 - Dynamic Denylist Rules
Important: Rule actions configured in the WafCharm Console take precedence. If you change the rule action from the AWS Management Console, it will be overwritten by the setting in the WafCharm Console. Always change rule actions from within the WafCharm Console.
Additionally, if you edit the rule directly from the AWS Management Console (e.g., by adding an IP address), the changes will not be retained. The rule will revert to the expected state based on the configuration in the WafCharm Console. If you want to block specific IP addresses manually, please use the manual denylist feature.
IP address to use
This setting determines which part of the request the rules should inspect for an IP address. The same configuration applies to allowlist, denylist, and dynamic denylist rules.
- Source IP
- Inspects the source IP address (client IP) of the request.
- Specific header (Reference: About the [IP address to use] option for AWS WAF v2)
- Inspects the IP address included in a specified HTTP header, such as X-Forwarded-For.
- When using a specific header, make sure to select the appropriate position of the IP address in the header using the [Position inside header] option.
For details on how to configure this setting, see:
Rule configurations in WAF Config (AWS WAF v2) – IP addresses – IP address to use
Exceptions (Exception IP List)
This feature allows you to register IP addresses that you do not want to be blocked by the dynamic denylist rule. IP addresses added to the [Exception IP List] will be excluded from the dynamic denylist rule (WafCharm_Automated_DenyIps_XXX) and will not be detected or blocked.
If you have IP addresses under your management that should not be denylisted, you can prevent them from being blocked by configuring exception settings in advance.
For more information on how to configure this, please refer to:
Rule configurations in WAF Config (AWS WAF v2) – Exceptions – IP addresses
Notes on IP address management features
- If you select the [Specific header] option and the specified header is missing from the request, or if the header does not contain an IP address, the request will not match the rule.
- For more details about IP addresses in headers, please refer to the AWS official documentation: Forwarded IP address
- When using the [Specific header] option, the dynamic denylist feature also inspects the IP address found in the specified header (e.g., X-Forwarded-For).
- If the header contains a list of IP addresses, the address evaluated will depend on the configuration in your WAF Config.
- To register multiple IP addresses, separate them with a line break.
- You can register up to 1,000 IP addresses.
- IP addresses can be specified using CIDR notation. Allowed ranges are /8 and /16 through /32.
- IPv6 is not supported.
- If no CIDR is specified, the address will be treated as /32.
- Once saved, changes generally take effect immediately. However, in some cases, there may be a slight delay before the update is fully applied.
Dynamic denylist [WAF log integration required]
This feature re-evaluates your WAF logs against hundreds of proprietary security signatures. IP addresses associated with detected threats are automatically added to the denylist.
Using the retrieved WAF logs, MR Plus re-processes them against Cyber Security Cloud’s proprietary signatures. Any matching IP addresses are automatically added to or removed from the denylist rule as block targets. If WAF log retrieval is disabled, this feature will not be active, and re-evaluation will not occur.
Please also keep the following in mind:
- There are two separate denylist-related rules:
- WafCharm_DenyIps_XXX: For manually registered IP addresses.
- WafCharm_Automated_DenyIps_XXX: For IP addresses added via the dynamic denylist feature or the IP reputation feature.
- Denylist update timing:
- Dynamic denylist feature: Every 5 minutes
- IP reputation feature: Once per day
- Manual denylist feature: Immediately (may vary slightly depending on conditions)
Notes on the dynamic denylist feature
- The dynamic denylist rule is updated continuously.
- Matched IP addresses are not registered permanently. If you need to block an IP address permanently, please use the manual denylist feature.
- Editing denylist rules managed by MR Plus from the AWS Management Console is not supported. Please refrain from making changes directly.
- If WAF log retrieval is disabled, this feature will not be active, and re-evaluation will not occur.
- Regardless of the WAF log retrieval status, both the manual denylist feature and Cyber Security Cloud’s proprietary IP reputation feature remain available.
- WAF log retrieval is only supported for WAF logs output directly to an S3 bucket. Kinesis Data Firehose and CloudWatch Logs are not supported. If either is used, the WAF log retrieval feature will not be available.
- If you select the [Specific header] option, the dynamic denylist feature will also evaluate the IP address found in the specified header (e.g., X-Forwarded-For).
- If the header contains a list of IP addresses, the address evaluated depends on the settings in your WAF Config.
- If the [Specific header] option is selected and the specified header is missing from the request, or the header does not contain an IP address, the request will not match the signature during re-evaluation.
How to configure the dynamic denylist feature [WAF log integration required]
- Output WAF logs directly to an S3 bucket from the AWS WAF screen in the AWS Management Console.
For instructions on how to output WAF logs in AWS WAF, please refer to:
Configuring logging for a protection pack or web ACL - In the [Log and Notification Configuration] screen, go to the [WAF log retrieval] tab and check the [Enable WAF log retrieval (Recommended)] box.
- Review the checklist related to S3 log output and field masking described in the prerequisites, then check the confirmation box.
- Click the [Add] button.
How to change the dynamic denylist rule action
Please refer to:
How to change rule actions for AWS WAF v2 - Dynamic Denylist Rules
Monthly report feature [WAF log integration required]
The monthly report feature aggregates retrieved WAF logs and generates a report at the beginning of each month. Reports are generated per WafCharm account. If you wish to view monthly reports per WAF Config, please upgrade to WafCharm.
The monthly report can be accessed from the [Report] link in the left-hand menu.
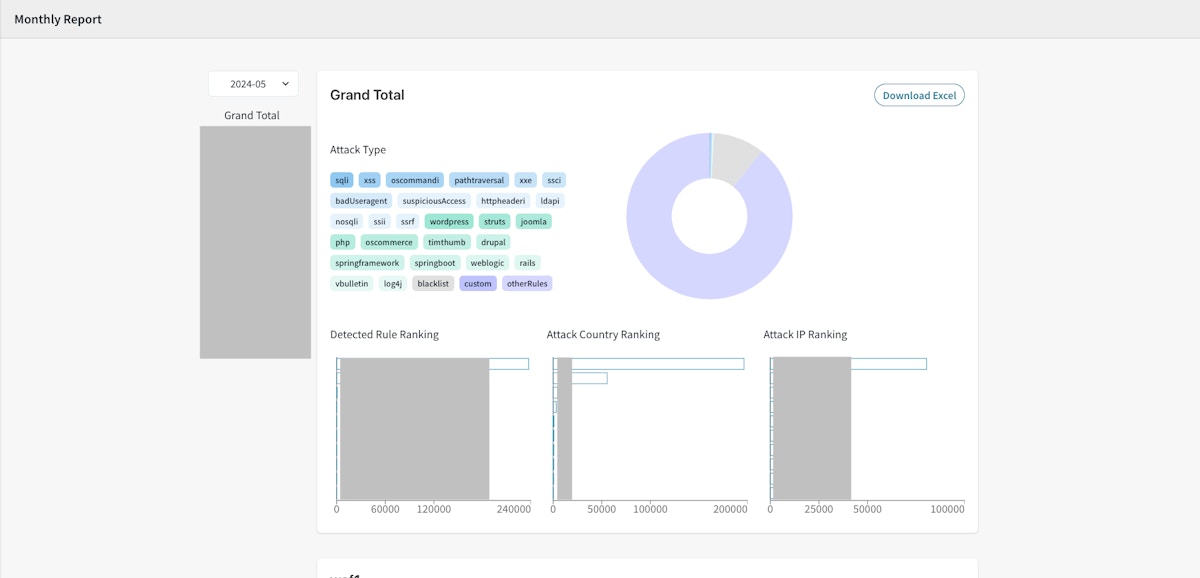
The monthly report includes the following information:
- Attack Type
- A list of detected attack types.
- Click on an attack type tag to filter the data shown in the pie chart.
- Only rules provided by MR Plus and CSC Managed Rules are categorized. Other rules are not categorized appropriately.
- Attack type breakdown (pie chart)
- A pie chart showing the aggregated attack types based on detected or blocked WAF logs.
- Detected Rule Ranking
- A top 10 ranking of the most frequently triggered rules.
- Attack Country Ranking
- A top 10 ranking based on the source countries of detected requests.
- Attack IP Ranking
- A top 10 ranking of detected IP addresses.
How to export monthly report data in Excel format
You can download the report data by clicking the [Download Excel] button in the upper right corner of the report page.
The downloaded Excel file will include the data available in the report.
Data such as counts shown via tooltip on hover will also be included in the Excel file. You can use the file to customize how the data is visualized based on your needs.
Notes on the monthly report feature
- Monthly reports are only generated if WAF log retrieval is enabled.
- WAF log retrieval supports only WAF logs output directly to an S3 bucket. Kinesis Data Firehose and CloudWatch Logs are not supported. If either is used, the monthly report feature will not be available.
- The Attack Type section in the monthly report only categorizes detections from rules provided by MR Plus and CSC Managed Rules (such as those designed to comprehensively defend against OWASP Top 10 attacks). Detections from other rules cannot be categorized appropriately. If you are not using CSC Managed Rules, it may be difficult to make full use of the Attack Type data.
- Monthly reports are generated based on WAF logs from the previous month.
- The feature cannot retrieve WAF logs retroactively, and logs that were not retrieved will not be included.
- Once a monthly report is generated, it cannot be recreated or regenerated.
- If AWS WAF cannot determine the geographic origin of a detected IP address, the report may display a hyphen (-) as the country name.
How to configure the monthly report feature [WAF log integration required]
- Output WAF logs directly to an S3 bucket from the AWS WAF screen in the AWS Management Console.
For instructions on how to output WAF logs in AWS WAF, please refer to:
Configuring logging for a protection pack or web ACL - In the [Log and Notification Configuration] screen, go to the [WAF log retrieval] tab and check the [Enable WAF log retrieval (Recommended)] box.
- Review the checklist related to S3 log output and field masking described in the prerequisites, then check the confirmation box.
- Click the [Add] button.
Member settings
In the WafCharm Console, the first account created is automatically granted the Owner permission. You can register additional member accounts associated with this Owner account.
Member accounts have the same permissions as the Owner account, as outlined below:
- Credential Store
- Used to register credential information so that MR Plus can access web ACLs and other required resources.
- Permissions: Add, view, edit, and delete.
- WAF Config
- Used to register information about your web ACLs.
- Permissions: Add, view, edit, and delete.
- Monthly Reports
- Used to view monthly reports when the feature is enabled.
- Permissions: View only.
- Members
- Used to configure member settings.
- Permissions: Add, view, edit, and delete.
Notes on member settings
- In MR Plus, there are only two types of permissions: Owner and Manager.
- The Owner permission is automatically assigned to the first account created. This permission cannot be changed, reassigned, or transferred.
- The Manager permission is assigned to all accounts other than the Owner account. In MR Plus, Manager accounts have the same permissions as the Owner account.
- All accounts must use a valid email address.
- Email addresses used for accounts in WafCharm or MR Plus must be unique across the entire WafCharm Console. Regardless of account type or role, an email address that is already registered, whether as an Owner or a member, cannot be reused. If you already have an account, please register with a different email address.
- Member accounts with the Manager role have permission to manage member accounts, but you cannot delete your own account. To delete your own Manager account, please use an Owner account. However, it is possible to delete other Manager accounts.
How to add a member account
To create a member account, both an existing registered account and the new member account user must complete the required steps.
First, perform the following steps using an existing (Owner or Manager) account:
- Sign in to the WafCharm Console.
- Click the user name in the upper-right corner of the screen.
- Click [Member Settings].
- Click [Add].
- Enter and select the required information, such as user name and email address.
- Click [Save].
The steps below must then be completed by the user of the new member account:
- A confirmation email will be sent to the registered email address of the member account.
- Click the [Confirm] link in the confirmation email.
Registration is complete when the message "Mail confirmation has been successfully completed." appears.
Your account will not be registered unless this step is completed. Be sure to confirm your email before proceeding. - Click [Sign in] to log in to the WafCharm Console.
If you are unsure of your password or need to reset it, please see: How to troubleshoot WafCharm accounts - I forgot my password.
- Check the displayed user name and click [Create Account] to proceed.
How to edit a member account
- Sign in to the WafCharm Console.
- Click the user name in the upper-right corner.
- Click [Member Settings].
- Click the row of the account you want to edit.
- Click [Edit].
- Make the necessary changes and click [Save].
If you change the email address, a confirmation email will be sent to the new address. The change will not take effect until the new address is confirmed, so please be sure to check the confirmation email.
How to delete a member account
- Sign in to the WafCharm Console.
- Click the user name in the upper-right corner.
- Click [Member Settings].
- Click the row of the account you want to delete.
- Scroll down in the account details pane and click [Delete].
- Click [Delete] again.
- When the confirmation pop-up appears, click [Delete] to confirm.