How to configure WAF Config for AWS WAF v2
AWS WAF v2Old PlanNew PlanAdvancedLegacyUsage
Overview
This article explains how to configure the WAF Config for AWS WAF v2.
The credential configuration must be completed before proceeding. If you have not completed the Credential configuration and do not have any Credential Store registered, please complete the Credential configuration first.
Procedure
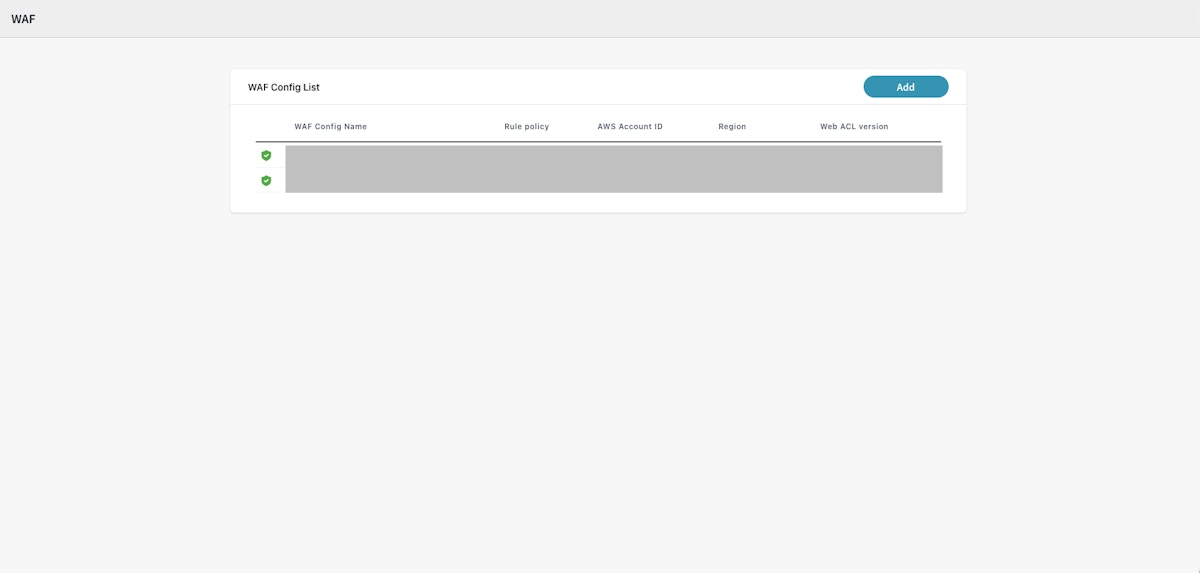
- Click [WAF] on the left menu
- Click [Add] on the upper right corner of the WAF Config section.
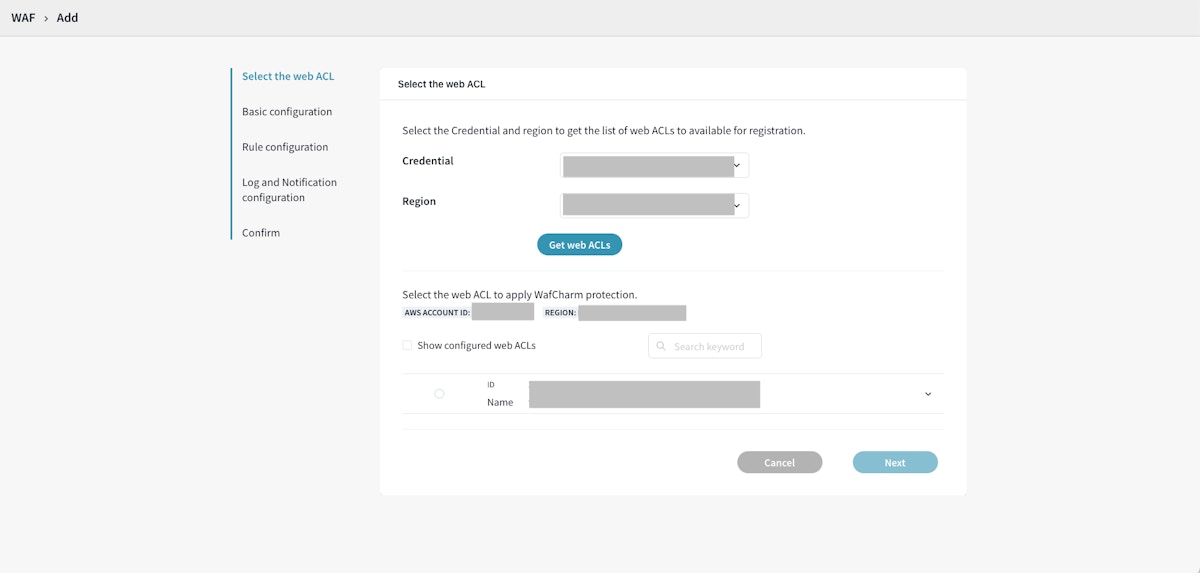
- Select the registered Credential.
- Select the region where the target web ACL exists.
- If you are using the old plan, choose [V2] under [WebACL version].
[V2] refers to AWS WAF v2.
This option does not exist for the new plan users because only AWS WAF v2 is available.
- Click [Get web ACLs].
- Select the radio button of the web ACL you want to apply WafCharm to and click [Next].
If you check the [Show configured web ACLs] checkbox, you can see the list of web ACLs currently using WafCharm.
Please keep in mind that you cannot re-register WafCharm for the web ACLs that already have WafCharm configured.
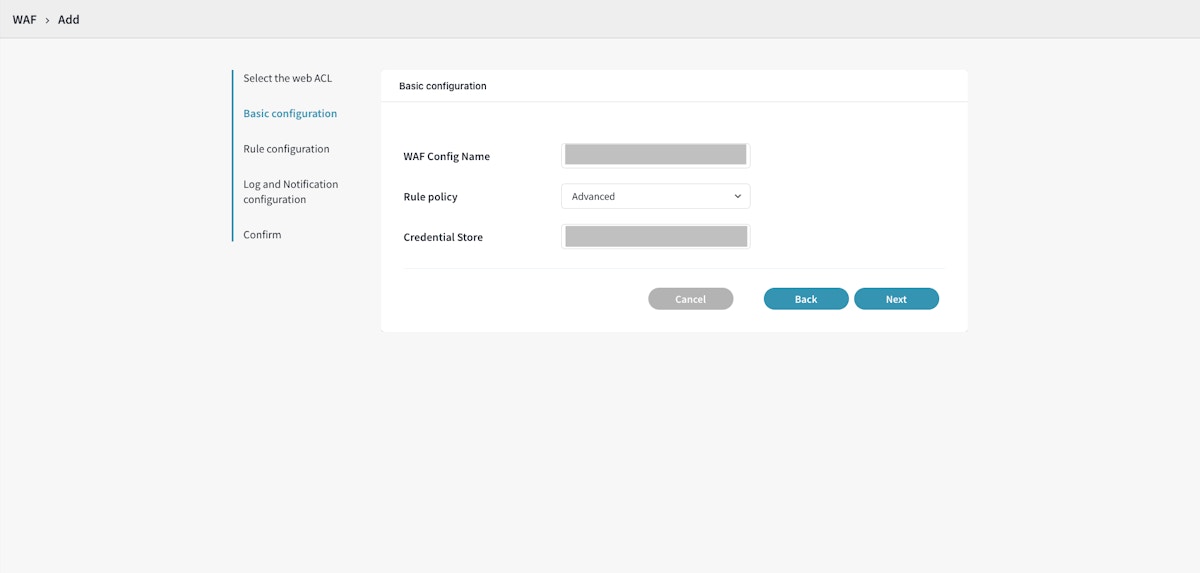
- Check the WAF Config name.
The web ACL name will automatically be entered. You can change the name to another value as well.
- If you are using the new plan, select a rule policy from the [Rule policy] drop-down menu. If you are using the old plan, this option will be unavailable.
Advanced: This is a new rule structure released with the WafCharm Console. It allows the configuration of rules such as rate-based rules, geo-match rules, and bot rules.
Legacy: A rule structure that has been available from the old WafCharm Dashboard. It allows the configuration of IP address-related rules.
When you select the Legacy rule policy, an item called [Default WAF Action] will appear beside WAF Settings. For more information, please refer to the About Default WAF Action section.
- Select the Credential Store.
This is the credential information WafCharm uses to update your web ACL.
You do not have to use the same credential store used to search web ACLs.
- Follow the steps below based on the rule policy you chose in the previous steps.
If You Selected the Advanced Rule Policy
- Configure each rule type in the [Rule configuration].
- IP addresses
- Geo-match
- Rate-based
- Bot
- Regular expressions (regex)
- Exceptions
- Configure WAF log integrations in [Log and Notification configuration].
How to configure WAF log integration (new method) for AWS WAF v2 Advanced
If you enable WAF log retrieval, several features, such as dynamic denylist, will also be enabled.
If you want to use these features, check the [Enable WAF log retrieval] checkbox and complete the configurations by following the instructions on the page.
If your WAF logs contain personal information, please refer to the AWS document [Web ACL logging configuration] and redact those fields beforehand.
- Confirm the registered information and click [Add].
If you want to adjust the configurations, click the [Go back] button to fix any settings.
- Wait for the loading icon to the left of the WAF Config you registered to turn into a green check mark.
If You Selected the Legacy Rule Policy
- Configure each rule type in the [Rule configuration].
Rule configurations in WAF Config (AWS WAF v2)
- IP addresses
- Exceptions
- Complete the log-related configurations in the [Log and Notification configuration].
How to configure access logs/WAF log integration for AWS WAF v2 Legacy
- Access log retrieval (required for ALB and CloudFront users)
- WAF log integration (optional)
- WAF log alert (optional)
Enabling WAF log retrieval is optional. If you want to refrain from configuring this option, do not check the [Enable WAF log retrieval] checkbox under the [WAF log retrieval] tab when adding a WAF Config. In addition, please avoid configuring the old method (Lambda method).
- Confirm the registered information and click [Add].
If you want to adjust the configurations, click the [Go back] button to fix any settings.
- Wait for the loading icon to the left of the WAF Config you registered to turn into a green check mark.
About Default WAF Action
When you select the Legacy rule policy, an item called [Default WAF Action] will appear under [Basic Configuration]. The Default WAF Action specifies which rule action WafCharm should apply when it inserts its predefined rules.
- When BLOCK is selected: the rules are inserted with the action set to Block.
- When COUNT is selected: the rules are inserted with the action overridden to Count.
The COUNT option in the Default WAF Action within WAF Config uses the mechanism called Rule action overrides provided by AWS WAF to override the rule actions to COUNT.
WafCharm rules include rules designed to detect/block suspicious requests. While the actual rule action defined within each rule is BLOCK, AWS WAF provides a mechanism to override this action to COUNT, enabling detection without blocking requests. Selecting COUNT in the Default WAF Action setting does not change the actual rule definitions.
If you select COUNT in the Default WAF Action setting, the rule action will be overridden to Count, and any requests that match the rules will be detected but not blocked. To block suspicious requests, you will need to manually change the rule action to Block in the AWS management console at a time of your choosing.
For instructions on changing the rule action to Block, please refer to How to change rule actions for AWS WAF v2.
Notes on the Default WAF Action Setting
- The Default WAF Action does not change the actions of the rules already applied in your Web ACL.
- The Default WAF Action is not linked to, nor does it affect, the rule actions of the rules in the AWS WAF (Web ACL).
- The Default WAF Action and the rule actions in AWS WAF (Web ACL) do not need to match.
- The allowlist rule allows requests from the registered IP address, so the Default WAF Action does not affect its rule actions.
- If you set COUNT as the Default WAF Action during the initial setup, please change the action to BLOCK after completing your testing. If the action remains set to COUNT, potential attacks will only be detected and not blocked.
- Rule actions for the rules in your web ACL must be changed in the AWS management console, as described in How to change rule actions for AWS WAF v2. When doing so, there is no need to update the Default WAF Action setting in WafCharm.
- As mentioned above, WafCharm rules are designed to block suspicious requests. Therefore, when using the Rule Action Overrides feature, please avoid selecting any option other than [Override to Count]. If you wish to change the rule action back to BLOCK, simply remove the override - no further configuration is typically required.
- The AWS Management Console may change as a result of AWS WAF updates. If the information in these help pages do not match the actual console screen, please refer to the official AWS WAF documentation.
Reference: Overriding rule actions in a rule group