How to configure WAF log integration (old method) for AWS WAF Classic
AWS WAF ClassicOld PlanLegacyUsage
Overview
This article explains how to configure WAF log integration with the old method (Lambda method) for AWS WAF Classic.
In the old method, the following procedure is used to set up.
- Using Amazon Data Firehose to export WAF logs to an S3 bucket
Preparations
To use the old method, you are required to create an IAM role and configure Lambda on the AWS management console.
Therefore, the AWS account you use on the AWS management console must have the permissions listed below.
If you have permissions equivalent to the ones listed below, you should be able to complete all the steps.
- AWSLambda_FullAccess
- IAMFullAccess
- CloudWatchFullAccess
- AmazonKinesisFullAccess
Procedure
How to use the feature
The architecture overview is as follows.
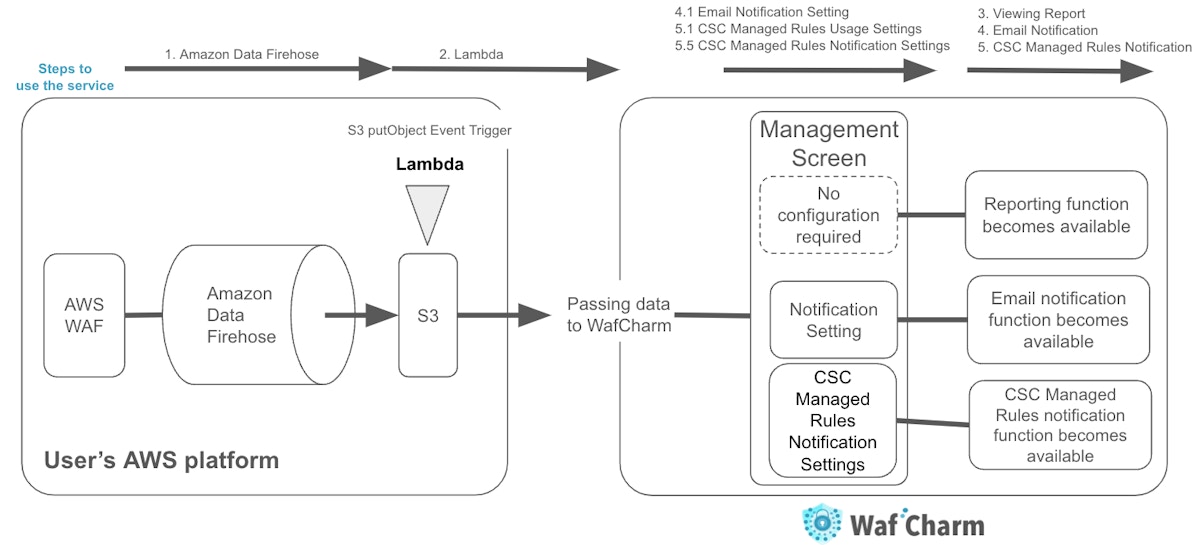
AWS WAF will output WAF logs to an S3 bucket via Amazon Data Firehose on your AWS environment.
When WAF logs are output to an S3 bucket (S3 putObject Event Trigger), it triggers the Lambda to execute the script.
The data is transferred to WafCharm and monthly reports can be created and viewed without any additional configurations at the beginning of each month.
If you configure email notification settings for WafCharm rule detections on the WafCharm Console, you can use the WAF log alert (notification detection) feature. If you are using CSC's managed rules with WafCharm, you can also receive detection notifications for the detections by CSC's managed rules by turning the CSC's managed rule detection notification on.
Configure Amazon Data Firehose
- Sign in to the AWS management console.
- Switch to the same region as your web ACL.
If you are attaching CloudFront to your web ACL, select US East (N. Virginia).
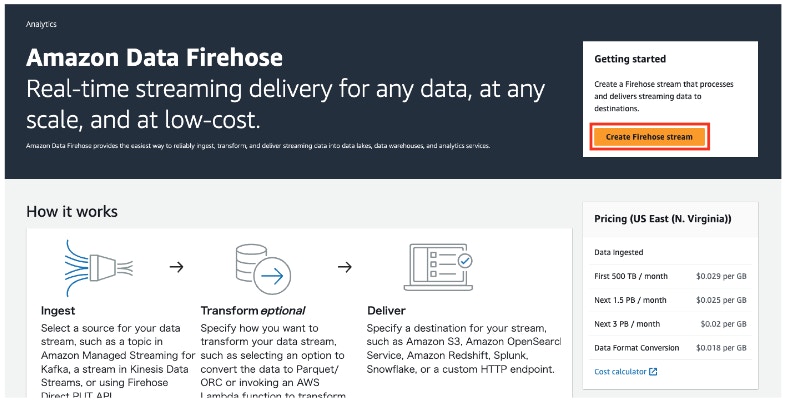
- Open [Amazon Data Firehose].
- Click [Create Firehose stream].
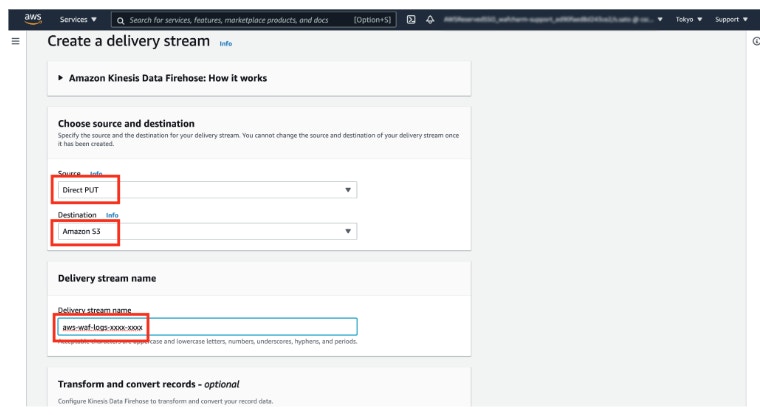
- Select the options below under the [Choose source and destination] section.
- Source: Direct PUT
- Destination: Amazon S3
- Firehose stream name: enter a name that begins with [aws-waf-logs-]
Per AWS specification, you are required to add [aws-waf-logs-] in the beginning of the stream name.
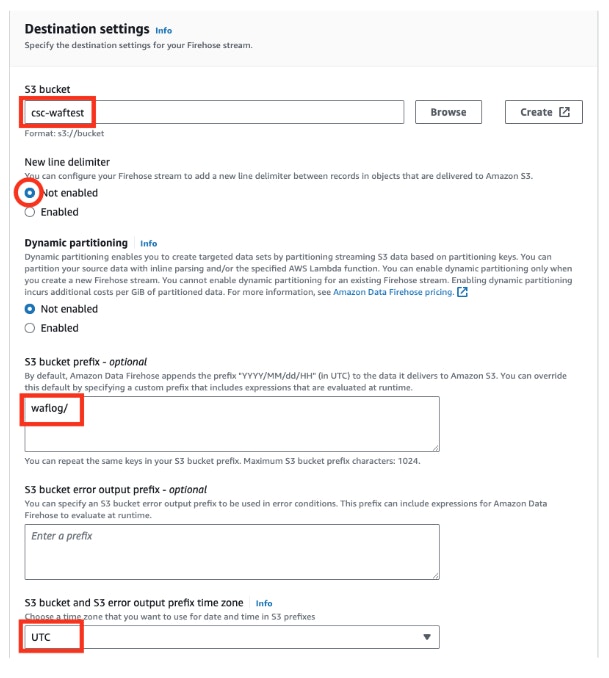
- S3 bucket: select any S3 bucket folder you wish to use (e.g.: csc-waftest)
- S3 bucket prefix (optional): enter a prefix (e.g.: waflog/)
If you want to add a prefix, make sure to add a slash (
/) at the end. - S3 bucket and S3 error output prefix time zone: UTC
Please choose UTC here because the feature may not work properly with different timezone.
- Buffer size: 5MB is recommended
Buffer interval: 60 seconds is recommended
*WAF logs are exported to the S3 bucket when they reach the specified buffer interval or buffer size.
- Compression for data records: GZIP
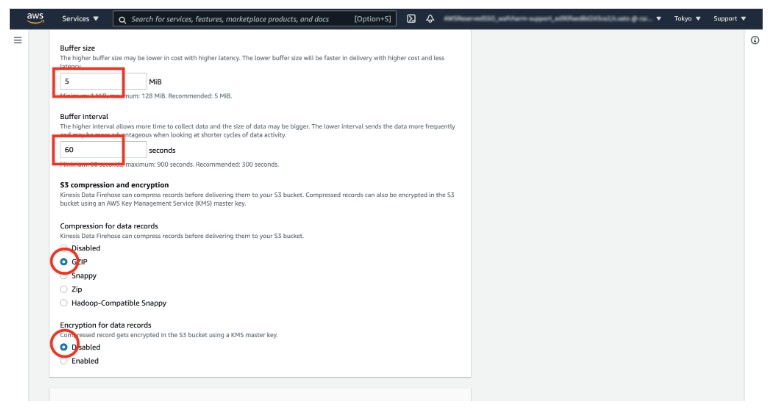
- Create or select service access (IAM role).
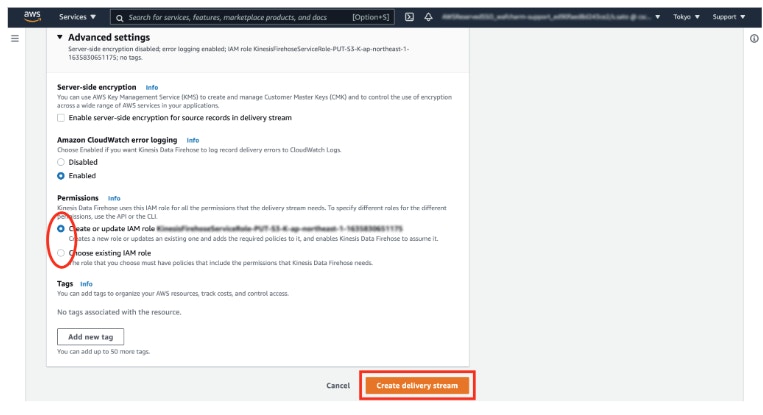
- Click [Create Firehose stream].
Output WAF logs on AWS WAF
- Open the list of web ACLs on AWS WAF Classic.
- Open the target web ACL.
- Click [Logging].
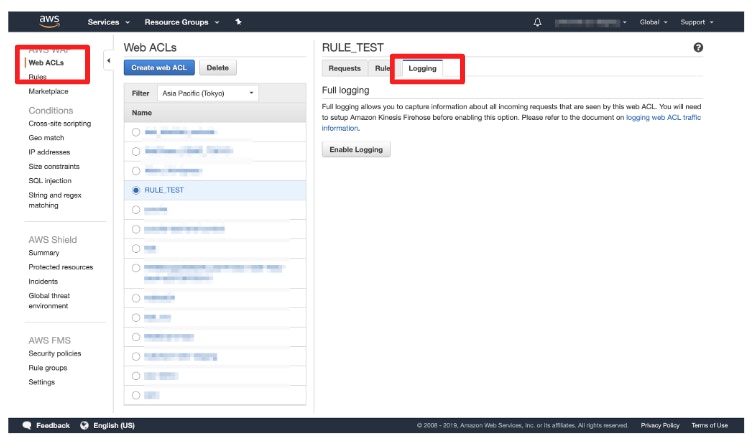
- Click [Enable Logging].
- Select the Data Firehose you just created under the [Amazon Kinesis Data Firehose].
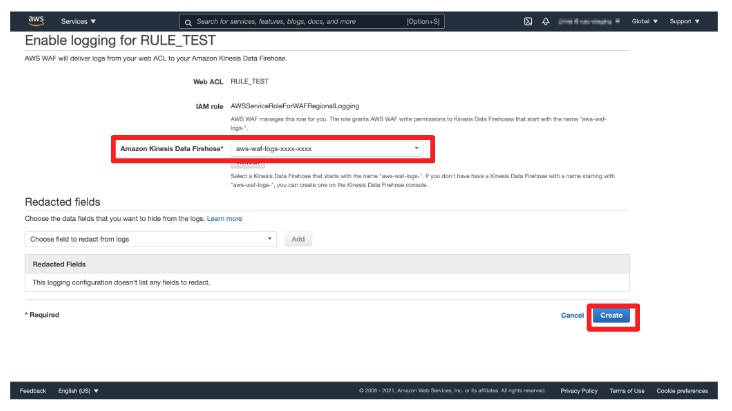
- Click [Create].
- Access the target resources and make sure that WAF logs are outputted to the expected S3 bucket.
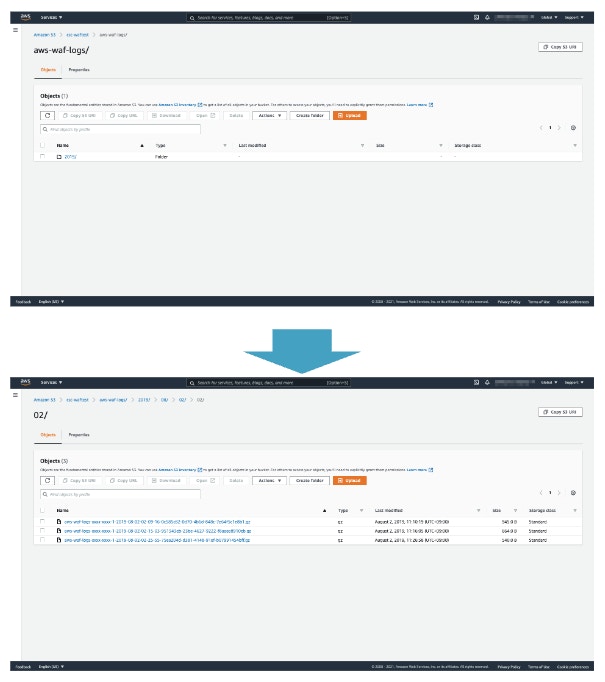
- Open the S3 bucket and check the path where WAF logs are outputted.
The format should be like below. You will use this information later.
csc-waftest/waflog/The S3 bucket name and prefix (or lack thereof) will depend on the options you chose in the previous steps.
Create an IAM policy and role used by Lambda
You will be creating the three items below.
- Read permissions to your S3 bucket.
- Put permissions to transfer WAF logs to WafCharm's S3 bucket.
- IAM role with the permissions above to be used by Lambda.
- Open IAM.
- Create a Read permission to your S3 bucket.
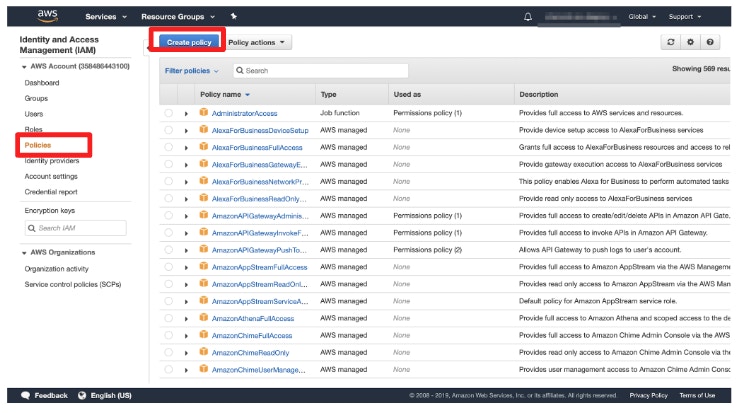
- Open [Policies] and click [Create policy].
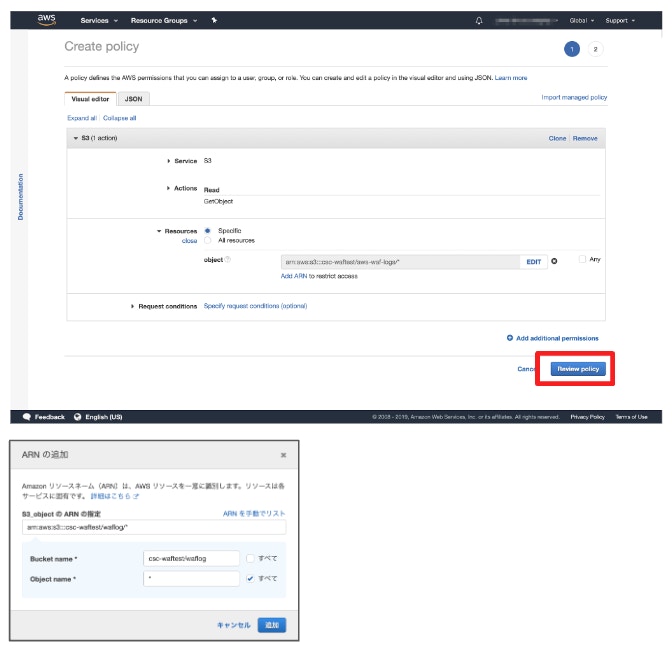
- Configure the options below.
- Service: S3
- Action: GetObject
- Resources:
arn:aws:s3:::csc-waftest/waflog/*Write the S3 bucket path you obtained in the previous steps. The path specified under the [Resources] must end with
/*.
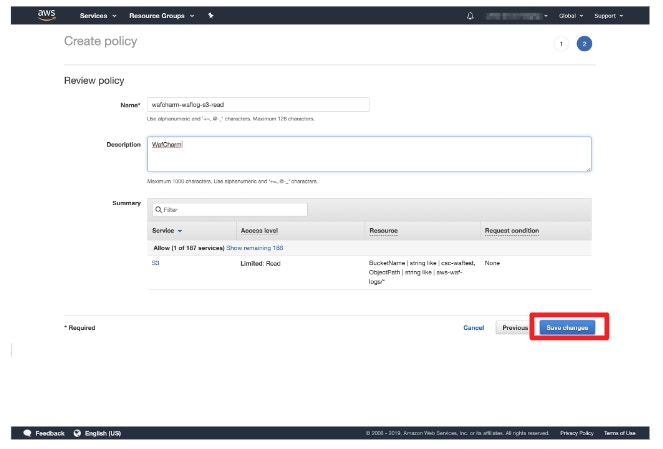
- Proceed to the Review policy page and enter the policy name and description (optional).
The name can be any value.
Example: wafcharm-waflog-s3-read
- Open [Policies] and click [Create policy].
- Create a Put permissions to transfer WAF logs to WafCharm's S3 bucket.
- Open [Policies] and click [Create policy].
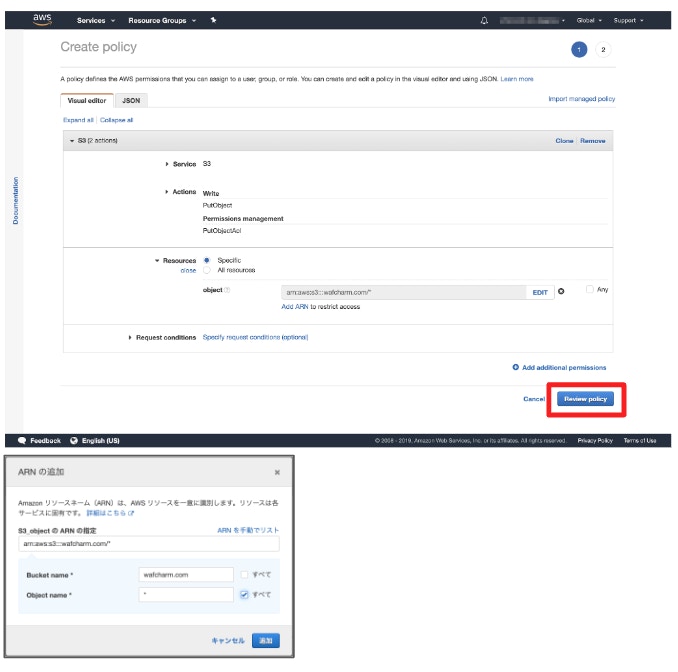
- Configure the options below.
- Service: S3
- Action: PutObject, PutObjectACL
- Resources:
arn:aws:s3:::wafcharm.com/*Enter WafCharm's S3 bucket (as specified above) to enable WAF log transfer. The path specified under the [Resources] must end with
/*.
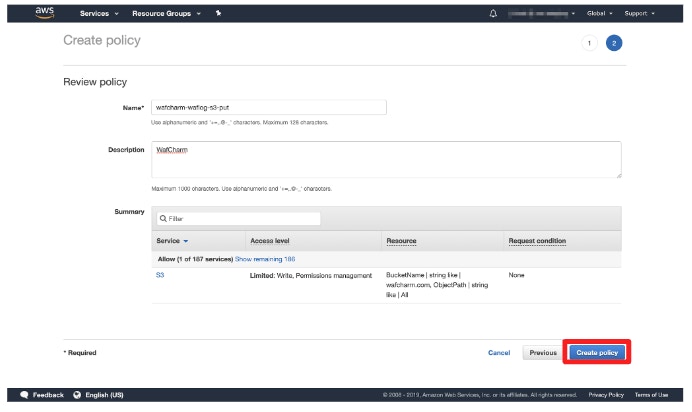
- Proceed to the Review policy page and enter the policy name and description (optional).
The name can be any value.
Example: wafcharm-waflog-s3-put
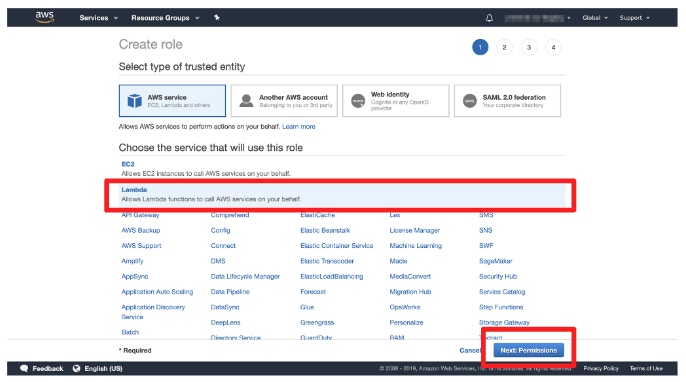
- Create an IAM role for Lambda.
- Open [Roles] and click [Create role].
- Choose [Lambda] for [Use case].
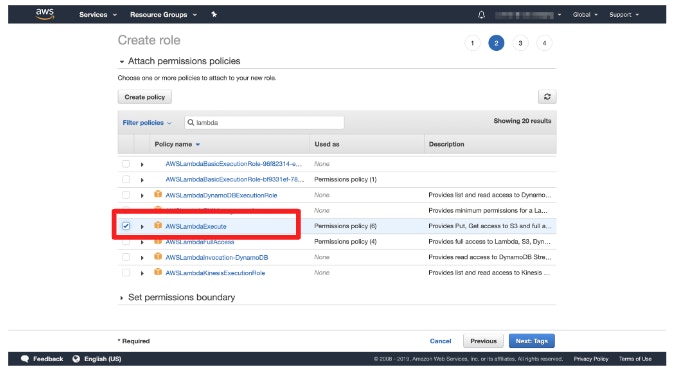
- Search for the permissions below under [Permissions policies] and check to add them.
- AWSLambdaExecute
- Read permission created in the previous steps (e.g.: wafcharm-waflog-s3-read)
- Put permission created in the previous steps (e.g.: wafcharm-waflog-s3-put)
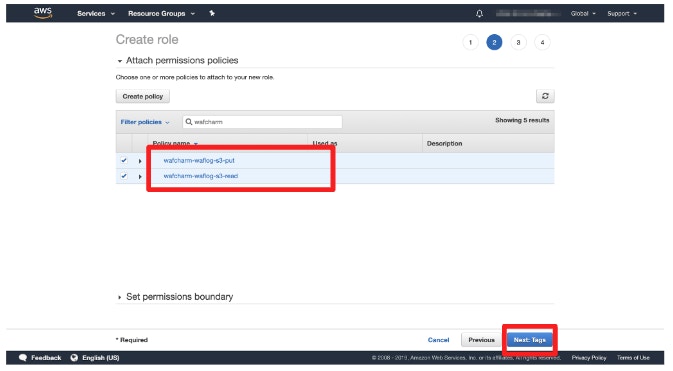
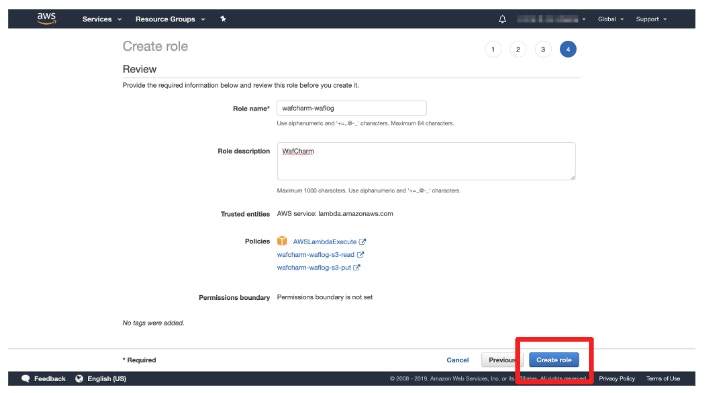
- Proceed to the next page and enter the role name and description (optional).
The name can be any value.
Example: wafcharm-waflog
Configure Lambda
- Switch to the same region as your S3 bucket.
- Open Lambda.
- Click [Create function].
- Enter [Function name].
The name can be any value.
Example: wafcharm-waflog
- Configure the options below.
Runtime: Node.js 20.x ~ Node.js 22.x
Execution Role: Use an existing role
Existing role: Select the IAM role you created in the previous steps (e.g.: wafcharm-waflog)
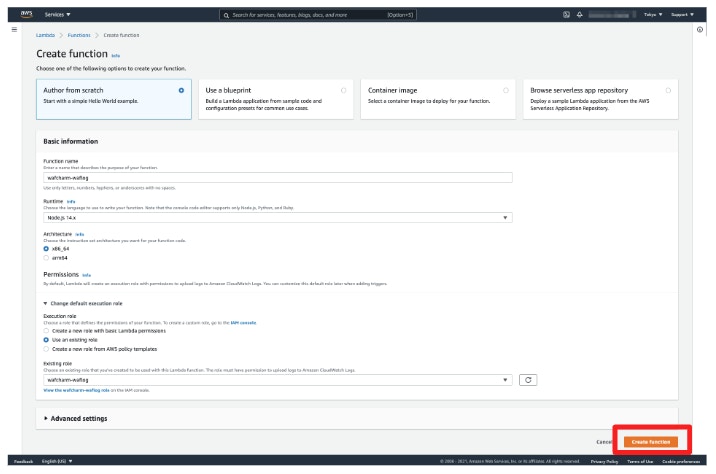
- Click [Create function].
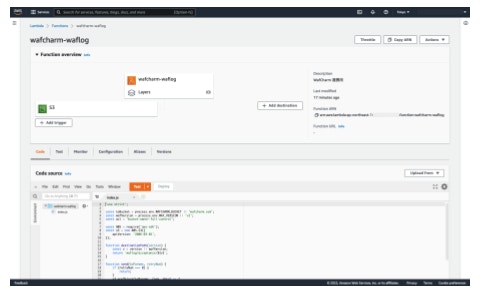
- Paste the index.mjs available below in the editor under the [Code source].
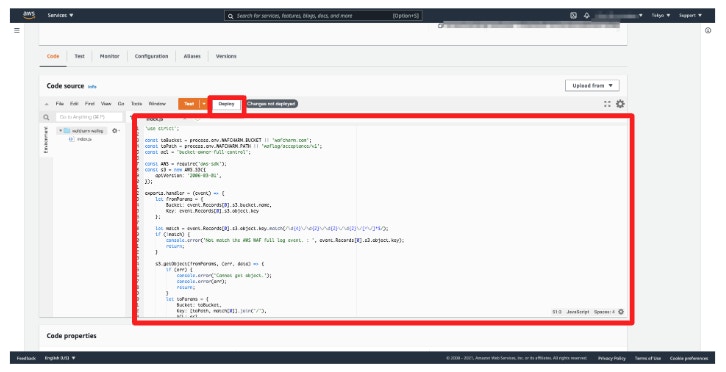
- Make sure that you are using the correct index.mjs because the content is different from index.mjs for AWS WAF v2.
- Click the [Deploy] button.
- Click the [Add trigger] button.
- Configure the options below.
Select a source: S3
Bucket: the S3 bucket you created in the previous steps
Event types: All object create events
Prefix: prefix of the S3 bucket you created in the previous steps (e.g.:
waflog/)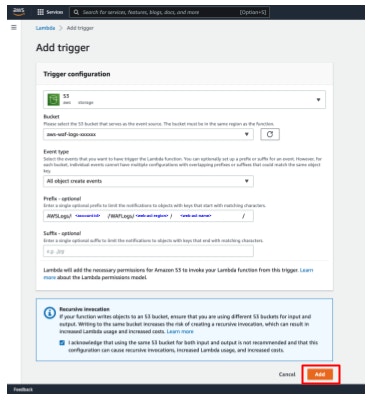
- Click [Add].
- Click [Configuration].
- Click the [Edit] button to the right of [General configuration].
- Configure the options below.
Description (optional)
Timeout: 1 minute
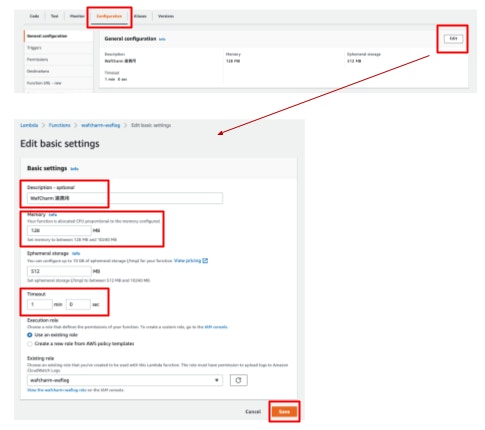
- Click [Save].
Configure retention period for Lambda's execution logs on CloudWatch Logs
This configuration is optional.
If you want to change the retention period for your logs, please follow the steps below.
- Execute the Lambda script.
Access the target resources to output WAF logs. The Lambda script is triggered when the WAF logs are outputted to the S3 buckets.
- Open CloudWatch.
- Click [Log groups].
- Check the checkbox of the Lambda's log group.
- Click [Edit retention setting(s)] from the [Action] menu.
- Change the period under the [Expire events after:] drop-down menu.
The default is set to [Never expire]. Please adjust the period as necessary.